Example DigitalOcean Load Balancer Setup
DigitalOcean, like many other cloud providers, offers a paid load balancer service with broad capabilities.
Goal and Starting Conditions
The goal of configuring the load balancer is to provide security and fault tolerance for your service using the provider's tools, in this example DigitalOcean.
Before starting, you should already have a SHIPOPS cluster with at least three system nodes. This example assumes that routing has not yet been configured and only an external domain name has been set, for example mycluster.myproject.com. In this case, the cluster provides only the branded SHIPOPS welcome placeholder service, which is used to test entry point configuration.
When creating servers for a cluster in DigitalOcean, it is convenient to assign them a common tag in advance, for example MyCluster. This makes it easier to associate these servers with the Load Balancer and Firewall services: you can specify the tag in the selection form instead of manually collecting a list of servers.
This example uses a regional load balancer. As a result, the service should open reliably at https://mycluster.myproject.com, and direct access to nodes bypassing the load balancer should be restricted.
Step 1. Add the domain to DigitalOcean
Add the myproject.com domain in the Networking/Domains section.
In the list of DNS records, you will see NS records that need to be specified in the settings of the DNS provider where the myproject.com domain was purchased (for details, see how to transfer management). After that, you can proceed to the next step.
Step 2. Create and configure a Load Balancer
Create a regional Load Balancer in the Networking/Load Balancers section. Add all system nodes of your cluster to it. If they have a common tag, specify it in the selection form. In the Scaling setting, we recommend using 2 servers, although to save money at the first stage you can choose 1 and sacrifice some fault tolerance. This value can also be changed after the service is created.
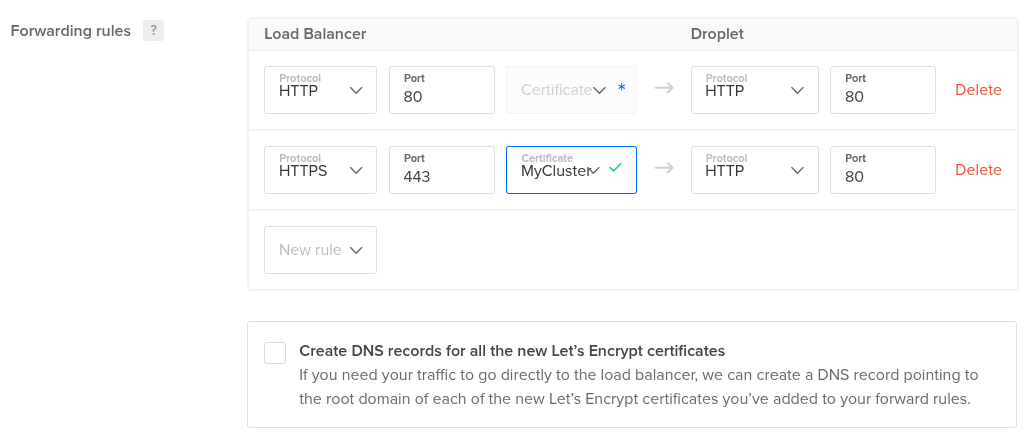
Add an HTTPS forwarding rule from port 443 to HTTP port 80. Create a certificate by selecting the domain from step 1. In this example, include the mycluster subdomain so that the new certificate is issued for mycluster.myproject.com.
After configuring the Load Balancer, a CNAME record may appear, creating an alias from myproject.com to mycluster.myproject.com. It will not work as expected because routing in the example cluster is configured only for mycluster.myproject.com. Therefore, delete this record and create an A record for mycluster.myproject.com instead, pointing to the load balancer IP address shown in the IP Address field in the list of load balancers.
In this example, the MyCluster certificate has been created. For more about certificates, see Managing certificates.
Also add an HTTP rule on port 80 and make sure to enable Redirect HTTP to HTTPS.
![]()
Enable Health checks tcp://0.0.0.0:80. This check tracks the availability of TCP port 80 on the system node and uses it to determine whether the node is available. The default HTTP protocol must not be used, because the cluster does not route HTTP requests without a domain name.
![]()
After completing the configuration, wait until the status of all three nodes changes to Healthy and the load balancer has a public IP address.
Step 3. Restrict direct access to cluster nodes
After step 2 is complete, the service already works: the browser shows the SHIPOPS welcome page at https://mycluster.myproject.com and http://mycluster.myproject.com. Fault tolerance has been addressed, but security has not yet been fully addressed. A request to http://mycluster.myproject.com is redirected to https://mycluster.myproject.com, but port 80 of any node can still be accessed directly, bypassing the load balancer. Example of such unauthorized access:
curl -H "Host: mycluster.myproject.com" 8.8.8.8
where instead of 8.8.8.8, use the public IP address of any node included in the load balancer. Most likely, this address is also used for SSH connections.
This vulnerability can be closed with the free Firewall service.
Create a Firewall in the Networking/Firewalls section, for example ssh-only-for-my-cluster, and configure inbound traffic rules.
Firewall affects not only traffic on public interfaces, but also traffic inside the private VPC network. By default, it denies all traffic except SSH, including over the private network. This will disrupt cluster operation, because nodes will lose the ability to communicate inside the VPC. Therefore, when enabling Firewall, you must explicitly allow TCP and UDP traffic in the private network. Allowing ICMP is not required, but in this example it is allowed to make network testing easier.
An example inbound traffic configuration is shown below. Outbound rules can be left unchanged. In the Sources field, select your VPC and your Load Balancer instead of the values shown in the screenshot.
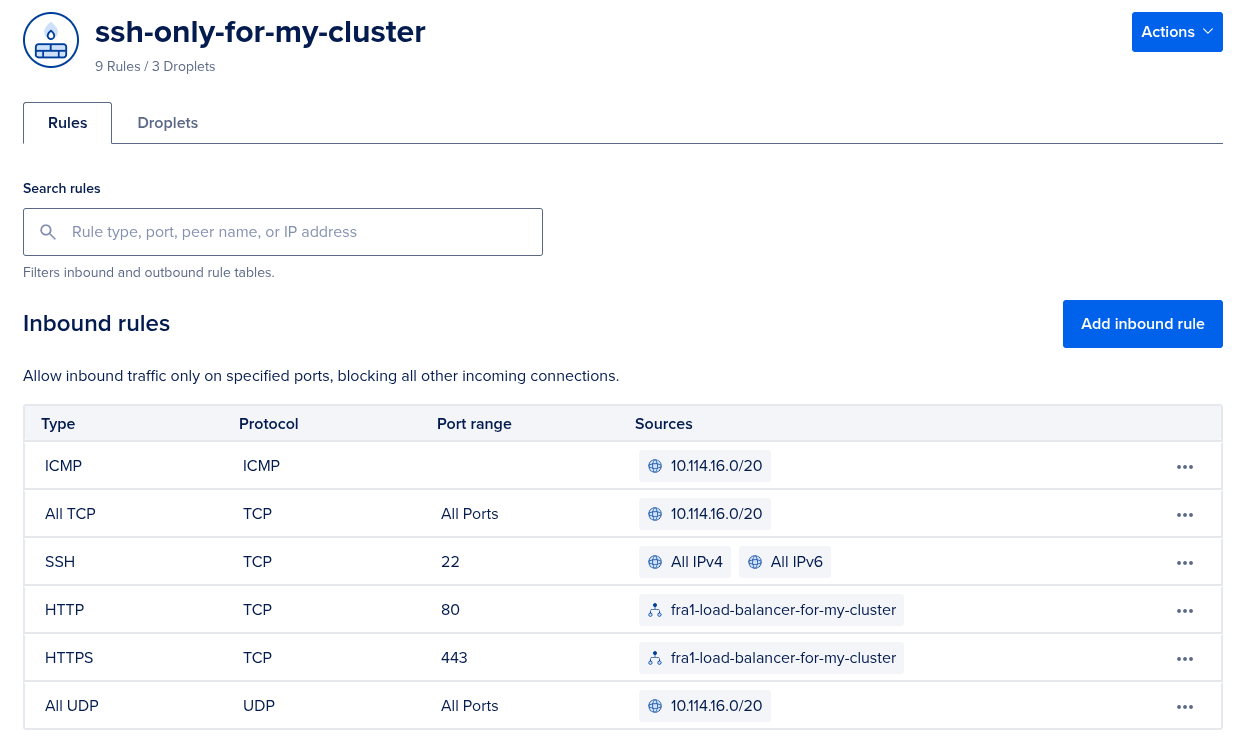
According to these rules, public access is allowed only to port 22, which SHIPOPS needs to manage the cluster. Public access to all other ports bypassing the Load Balancer will become impossible after this.
Security and fault tolerance for the service are now configured. All that remains is to configure routing in SHIPOPS from the root service to your project service instead of the placeholder service. TLS does not need to be enabled in SHIPOPS, because HTTPS is provided by the Load Balancer, for which the certificate was configured in step 2.